nginx配置http服务器,反向代理,负载均衡
已被阅读 2250 次 | 文章分类:日常随笔 | 2021-03-18 01:23
nginx跟apache,iis一样都是一个http服务器,可以用来部署网站,那么nginx有哪些具体的用法,下面简单介绍几种;
一 nginx可以作为http服务器
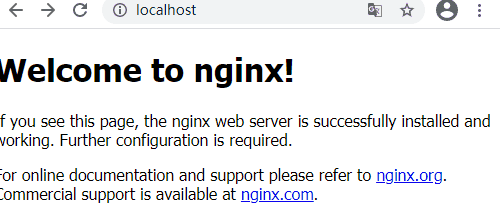
nginx和iis apache一样,可以作为一个http服务器,当然包括web服务器(可以部署前端项目);配置也很简单,下面是常见的几种方式
# 默认去找html文件夹下的index.html 作为启动页面
location / {
    index  index.html index.htm;
}
# 该路径去找html文件夹下web1文件夹中index.html 作为启动页面
    location /web1 {
    index  index.html index.htm;
}
# 该路径去找html文件夹下的web2文件夹中index.html 作为启动页面
   location /web2 {
    index  index.html index.htm;
}
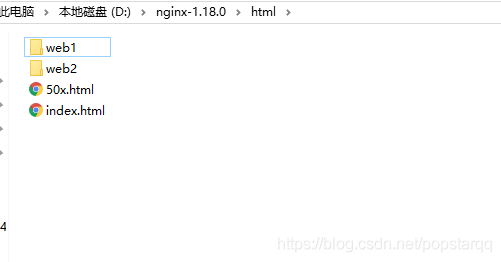
具体的文件目录和演示效果如下
二 配置反向代理
反向代理是当客户端发起请求到服务器A,A从其他服务器B请求数据返给客户端,客户端只知道数据是从A上获取的,并不知道真实的来源,这个时候服务器A就是反向代理服务器
相反,正向代理服务器的概念是 客户端想请求服务器B上的数据,但是不能直接访问,所以需要借助中间的代理服务器去帮忙请求数据,返回给客户端,比如 国内用户访问谷歌,需要借助vpn 就是一个常见的正向代理过程
我这里用另一台电脑启动一个nodejs接口,然后在nginx所在的电脑上配置和访问效果如下
server {
	listen       80;
	server_name  localhost;
	location /api {
		proxy_pass http://192.168.1.6:8088;
	}

}

nodejs 启动接口,借助express很方便,新建index.js文件如下;启动接口在该目录执行node index.js即可
const express = require('express')
const app = express()
app.all("*",function(req,res,next){
    res.header("Access-Control-Allow-Origin", "*");
    res.header("Access-Control-Allow-Headers", "X-Requested-With");
    res.header("Access-Control-Allow-Headers", "Content-Type");
    res.header("Access-Control-Allow-Methods","PUT,POST,GET,DELETE,OPTIONS");
    res.header("X-Powered-By",' 3.2.1')
    res.header("Content-Type", "application/json;charset=utf-8");
    next();
})
let json = {
  type: 0,
  code: '0',
  msg:'查询成功',
  data: {
    server:'来自8088'
  }
}
app.get("/api/getinfo", function (req, res) {
  res.send({data:json})
})
// 启动服务器
app.listen(8088, function () {
  console.log("启动服务 http://localhost:8088 ")
})
三 配置统一端口号
应用场景,比如我们在阿里云服务器部署网站,如果前端项目部署在iis端口是8088,后端接口部署在nodejs 端口是8089;正常情况下,web项目中需要通过8089端口请求数据;当网站部署后,查看network请求,可以看到好多不同得端口号,不太美观也不专业;这时候就可以用nginx统一分发端口,配置如下
server {
	listen       80;
	server_name  localhost;

	#charset koi8-r;

	#access_log  logs/host.access.log  main;

#网站前端接口 nodejs部署
location /api {
		proxy_pass http://localhost:8001;
	}

# 网站后端管理接口 java部署
location /admin {
		proxy_pass http://localhost:8002;
	}

# 网站前端 iis部署
location / {
		if ($request_method = 'OPTIONS') {
			add_header 'Access-Control-Allow-Origin' '*';
			add_header 'Access-Control-Allow-Methods' 'GET, POST, OPTIONS';
			add_header 'Access-Control-Allow-Headers' 'DNT,X-CustomHeader,Keep-Alive,User-Agent,X-Requested-With,If-Modified-Since,Cache-Control,Content-Type';
			add_header 'Access-Control-Max-Age' 1728000;
			add_header 'Content-Type' 'text/plain charset=UTF-8';
			add_header 'Content-Length' 0;
			return 204;
		 }
		 if ($request_method = 'POST') {
			add_header 'Access-Control-Allow-Origin' '*';
			add_header 'Access-Control-Allow-Methods' 'GET, POST, OPTIONS';
			add_header 'Access-Control-Allow-Headers' 'DNT,X-CustomHeader,Keep-Alive,User-Agent,X-Requested-With,If-Modified-Since,Cache-Control,Content-Type';
		 }
		 if ($request_method = 'GET') {
			add_header 'Access-Control-Allow-Origin' '*';
			add_header 'Access-Control-Allow-Methods' 'GET, POST, OPTIONS';
			add_header 'Access-Control-Allow-Headers' 'DNT,X-CustomHeader,Keep-Alive,User-Agent,X-Requested-With,If-Modified-Since,Cache-Control,Content-Type';
		 }
		proxy_pass http://localhost:8088;
	}

}
我的网站也用到了该方式
四 配置负载均衡
负载均衡 简单来讲就是客户端向服务器发起请求后,服务器会转发到多个服务器返回数据,减小每个服务器的压力,提升返回数据的性能;当然这里没有多个服务器,我们先用不同端口号替代,效果一样的
第一 首先用nodejs模拟启动两个服务接口 分别用 node server1.js 和node server2.js启动
server1.js

const express = require('express')
const app = express()
app.all("*",function(req,res,next){
    res.header("Access-Control-Allow-Origin", "*");
    res.header("Access-Control-Allow-Headers", "X-Requested-With");
    res.header("Access-Control-Allow-Headers", "Content-Type");      //解决Request header field Content-Type is not allowed by Access-Control-Allow-Headers in preflight response.
    res.header("Access-Control-Allow-Methods","PUT,POST,GET,DELETE,OPTIONS");
    res.header("X-Powered-By",' 3.2.1')
    res.header("Content-Type", "application/json;charset=utf-8");
    next();
})
let json = {
  type: 0,
  code: '0',
  msg:'查询成功',
  data: {
    server:'来自8080'
  }
}
app.get("/api/getinfo", function (req, res) {
  res.send({data:json})
})
// 启动服务器
app.listen(8080, function () {
  console.log("启动服务 http://localhost:8080 ")
})
server2.js

const express = require('express')
const app = express()
app.all("*",function(req,res,next){
    res.header("Access-Control-Allow-Origin", "*");
    res.header("Access-Control-Allow-Headers", "X-Requested-With");
    res.header("Access-Control-Allow-Headers", "Content-Type");      //解决Request header field Content-Type is not allowed by Access-Control-Allow-Headers in preflight response.
    res.header("Access-Control-Allow-Methods","PUT,POST,GET,DELETE,OPTIONS");
    res.header("X-Powered-By",' 3.2.1')
    res.header("Content-Type", "application/json;charset=utf-8");
    next();
})
let json = {
  type: 0,
  code: '0',
  msg:'查询成功',
  data: {
    server:'来自8081'
  }
}
app.get("/api/getinfo", function (req, res) {
  res.send({data:json})
})
// 启动服务器
app.listen(8081, function () {
  console.log("启动服务 http://localhost:8081 ")
//})
第二 配置nginx负载均衡,如下,关键就是配置两个服务器地址
upstream xiaobai {
    server localhost:8080;
    server localhost:8081;
}
server {
    listen       80;
    server_name  localhost;
    location / {
        proxy_pass http://xiaobai;
        proxy_set_header Host $host:$server_port;
    }
}
然后访问地址localhost/api/getinfo
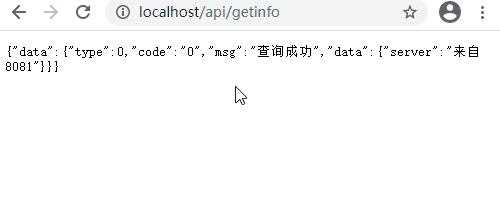
第三 上面的配置是默认方式,访问会随机分配服务器,其实可以配置每个服务器的权重,如下
upstream xiaobai {
    server localhost:8080 weight=9;
    server localhost:8081 weight=1;
}
server {
    listen       80;
    server_name  localhost;
    location / {
        proxy_pass http://xiaobai;
        proxy_set_header Host $host:$server_port;
    }
}
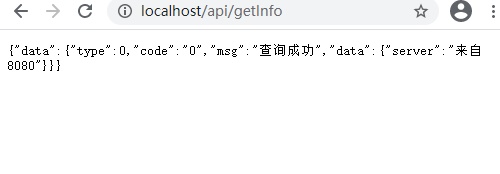
这样一来权重值比较大的服务器会被请求次数较多,承担更多的请求压力。